Digital cards are generally used in smartphones or smartwatches. Each brand usually has its own application to manage swipes. Apple has Apple Wallet, Samsung uses Samsung Wallet, etc… Despite these brand distinctions, there are two methods that stand out above the rest:
- Apple Wallet: Apple’s wallet, reads .pkpass files from the device and allows to add them as passes. It is only for iOS devices.
- Google Wallet: Google Wallet is an application that can be installed on all Android devices. Using Google Cloud, it is possible to make Google Wallet API calls and add cards to a Google user.
Card generation at Apple
To create valid digital passes in Apple Wallet it will be necessary to obtain several certificates:
- Apple WWDR
- Developer account certificate
- Private keys of the developer account certificate
These will be used to sign on the pass and will allow Apple Wallet to verify that the origin of the .pkpass file is from a trusted source. The whole signing process can be done with openssl and from a terminal. To sign the pass it will be necessary to create some files that will store the information of this one, the files must be inside a directory called pass package, the files are:
- pass.jsoncontains the structure of the pass.
- manifest.jsoncontains a JSON whose keys will be the relative path to a file within the pass and the value will be the SHA1 of that file.
- icon.png: icon of the pass.
- signaturesignature generated with openssl.
Apart from these mandatory files, optional files can be added depending on the characteristics of a pass. For example, there are passes that allow adding other visible images inside the pass, such as a strip or a thumbnail. These files are optional, but if you want to add them you would have to enter strip.png or thumbnail.png inside the pass package. For more information on the structure of the different types of passes and the required and optional files, it is recommended to review the Apple documentation. It also shows the different fields that the passes have and the type of data to enter in those fields, if one of the fields has an incorrect data type the pass will not work.
Once the pass.json is built, we have to build the manifest.json. This file is a JSON file that contains as keys the relative paths of the files inside the pass package and whose value will be the SHA1 of the file. Neither the signature nor the manifest.json have to have a representative hash inside this file since, the first one has not been generated so far (we will see how to generate it) and the second one would not make sense to add it. For example, we have the following pass with the following files:
passTest/
>pass.json
|->icon.png
|->thumbnail.png
The manifest.json would have the following structure:
{
“pass.json”: <SHA1 of pass.json>,
“icon.png”: <SHA1 of icon.png>,
“thumbnail.png”: <SHA1 of thumbnail.png>
}
El manifest.json se almacenaría en el paquete del pase de la siguiente manera:
paseTest/
|->pass.json
|->icon.png
|->thumbnail.png
|->manifest.json
Once you have the files created with the necessary information you can proceed to the signature. Using openssl you would have to sign the manifest.json, the command will return a file that will represent the signature and this will be stored together with pass.json, manifest.json and the rest of the files in the pass package. The command to sign a pass would be similar to the following: openssl smime -binary -sign -certfile
<WWDR> -signer <Certified PK> -inkey <certificate> -in <manifest.json> -out <signature> DER -outform -passin pass:<password certificate>
This will sign the manifest.json and create a signature file, once signed the pass package is compressed into a .pkpass file. To compress to .pkpass it is necessary to compress to .zip and manually reformat it to .pkpass. For more information about the signature it is recommended to consult the documentation. If everything has worked correctly you should be able to open it, if not, you can debug it (only if you are on MAC) by opening the Console application and collecting the system logs when opening the card, it will show why it fails.
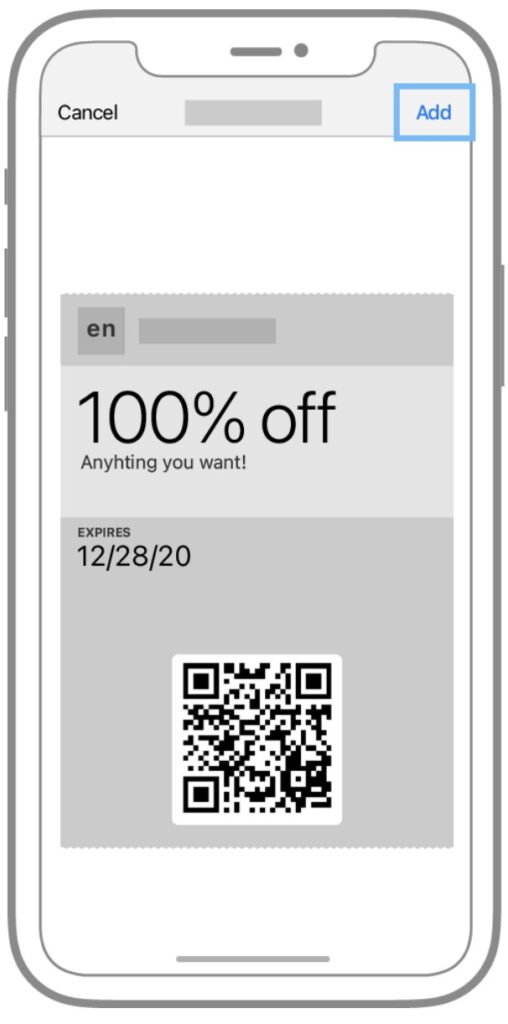
Mock-up of the Apple Wallet app with a pass to add.
Card generation in Google
Unlike Apple’s system, which consists of generating files representing the cards, Google has an API that can be accessed and associates a card to an account. The entire process of creating, signing and storing cards is done by these API endpoints and it is necessary to develop the functionality from scratch.
To start issuing cards in Google, it is necessary to have an account in Google Cloud Console. From there the Google Wallet API will be enabled and a service account can be created, which will be used to authenticate. Each account that enables the API has an issuerId, which will be used to associate the cards we generate to our issuer account. For more information on how to get started with Google’s service, click here.
The Google system is based on classes and instances (also called objects), both classes and objects have an ID to identify them, in the case of classes it follows the following structure “IdEmisor.IdClase” and for objects the following “IdEmisor.IdObjeto”. In this system, instances will inherit attributes from classes but never the other way around.
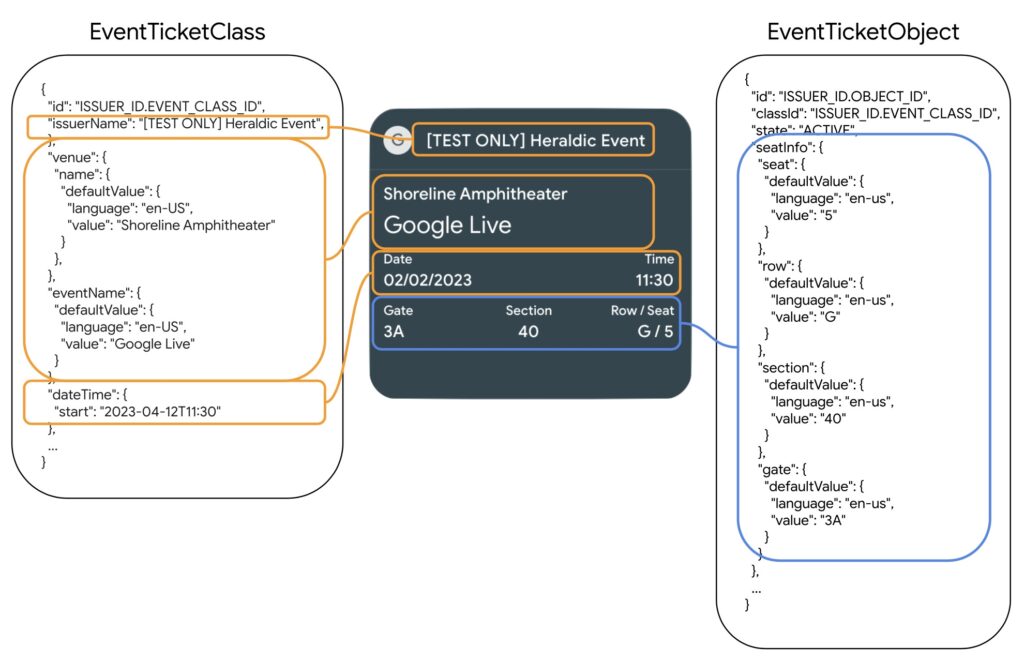
Inheritance of classes and objects in a pass.
A class stores information about the structure of the card or information shared by all users who will have that pass, for example, in the case of boarding passes, the class would store the structure of the information to be displayed: information about the flight such as time and airport of departure and arrival, among other fields, which are fields shared by all passengers.
On the other hand, the objects will include information only visible to the user who has that pass specifically in his account, for example, the name and surname, a unique reference number, among others, in short, the user’s information. As mentioned, these objects will inherit the class information so that the final card will contain the information of the class to which it belongs, in this case there will be flight and passenger information.
In terms of development, Google offers a Java library and an SDK to be able to call the service in a simple way. Using the functions offered in both alternatives, the different REST calls to the service will be made, for more information about the different calls and their components, you can click here. The link above also contains information about the structure of each type of card.
To create a card, it will be necessary to first build the class, from that class, it is possible to build the objects. The classes from the Java library are built using GenericClass, LoyaltyClass, GiftClass, among others, depending on the type of class you want to build, after that you would call the REST insert function from the service.
To check the classes created and their information, you can access the issuer’s console. In this screen a list of the existing classes and the information for each one of them will be shown, you can also update the fields if necessary.
To generate an object, you must associate it to a class and make sure that the type of the object is the same as that of the class. From the Java library the objects are constructed using GenericObject, LoyaltyObject, GiftObject, among others, depending on the type. Using the API endpoint insert it is possible to create the object. To send the card to the end user, a link must be sent with a token returned by the API when signing the pass.
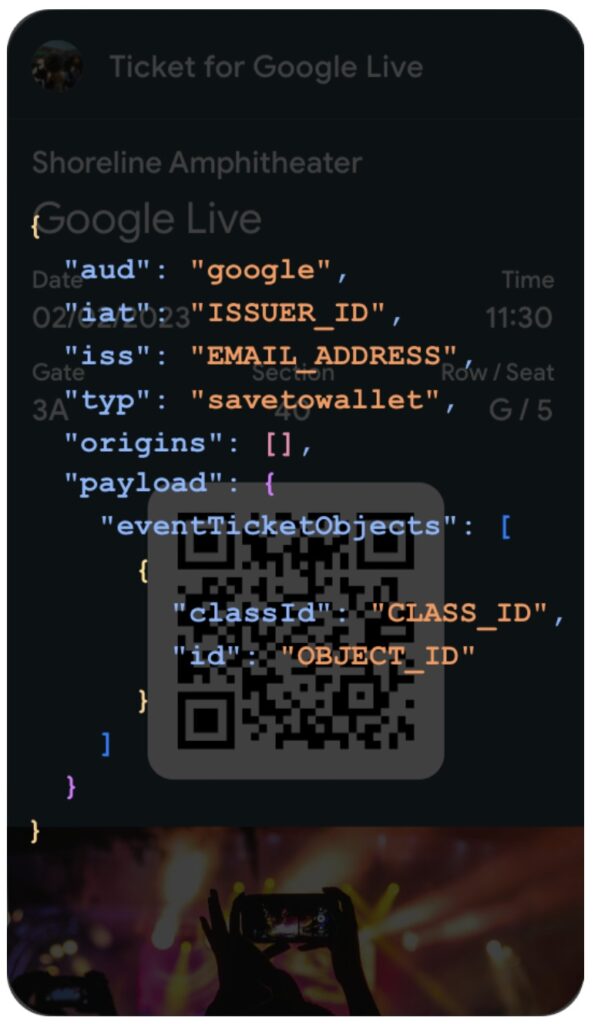
JWT generated.

Token generated from that JWT.
When creating an object in Google an instance is created in the form of a JWT, which can be sent with a call to the API. This call will sign the token using a secret, in case of the Java library the credentials of the service account will be used. Once signed, the call will return a token, this token can be used to send the pass to the end user. To do this, the following link must be sent to the user:
https://pay.google.com/gp/v/save/<token-devuelto>
If the class and object have been generated correctly, the link should work and, when accessed, should display the wallet application and the pass to add. For more information on how signing passes in Google Wallet works you can review the following link.
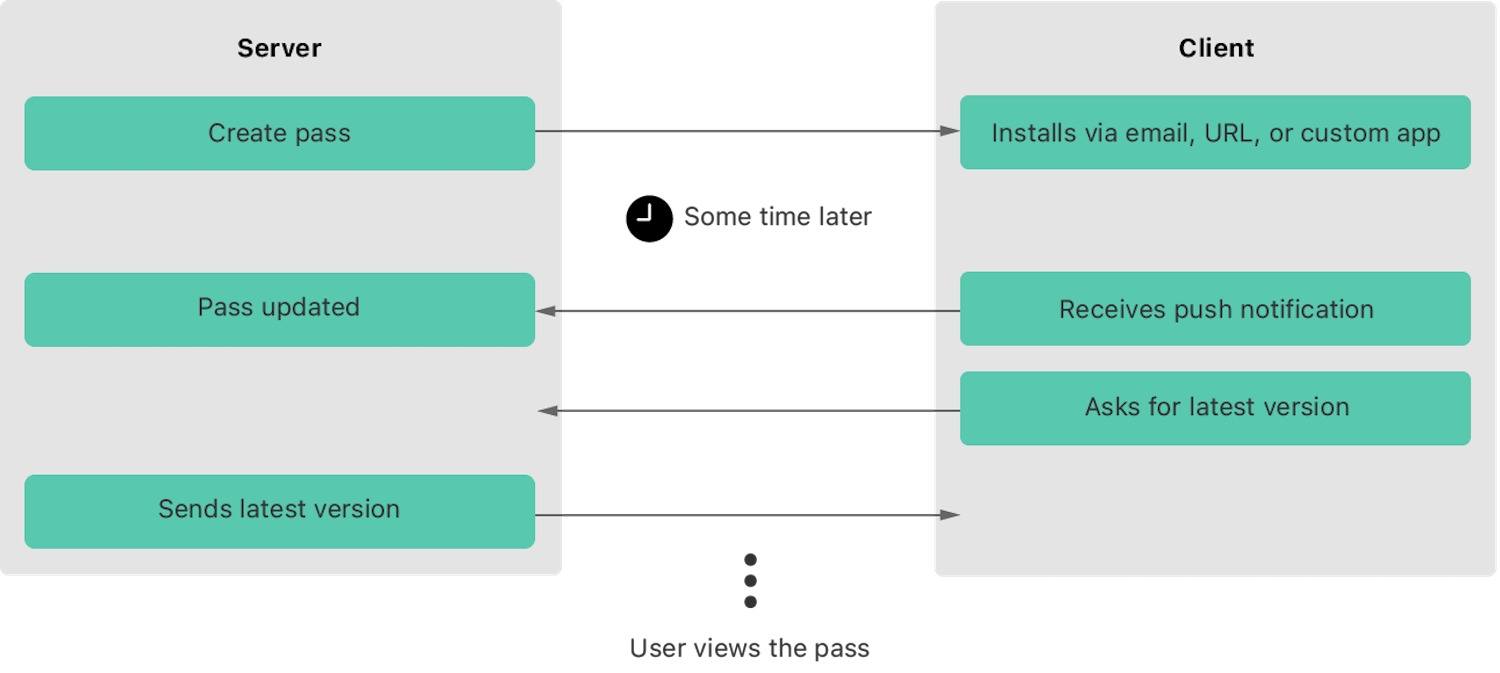
Update passes in Apple
To update passes in Apple you need to build a Web Service capable of handling the following calls:
- Registering a deviceIn a database, store the relationship between a device and a pass. The pushToken received in the body is the id of the device.
- Obtain lists of passes to be updatedFor a device, send the serial numbers of the passes that have not been updated.
- Return a passFor a serial number, return the corresponding .pkpass.
- Delete a passWhen the user deletes a pass in his wallet, delete the relationship between the pass and the device.
General operating diagram of the Web Service.
The .pkpass file will store the base route to the Web Service to know where to send the calls. Once the pass has the route to the Web service, the device carrying the pass is in charge of making the calls and receiving and managing the responses automatically. Within these calls, the Web Service will have other functions or calls to update the information stored in a pass.
Once we make sure that the pass has been added to the user’s device, we will need to register it on our device. This registration function will consist of storing the pass and device information to later check if the pass has received an update.

Diagram of a pass and device registration.
Similarly, it should be possible to delete the relationship between the pass and the device from our Web Service.

Diagram of sending a notification to the customer.
Even if the information is updated where we have it stored in our service (generally a database), the passes on the users’ devices will not be updated. For this, Apple offers to use an APNs, which will send “invisible” notifications to the device.

Diagram of sending a notification to the customer.
These notifications will not be visible to the owner of the device, but will serve to warn about the update of one or more passes. On the other hand, when the device receives an invisible notification, it will call the endpoint in charge of obtaining the list of passes to be updated (2), the endpoint will return a list of serial numbers to be updated and for each item in the list, if there is a pass stored with that serial number in the device, a request will be sent to obtain the pass (3). For more information about this process, you can visit this link.
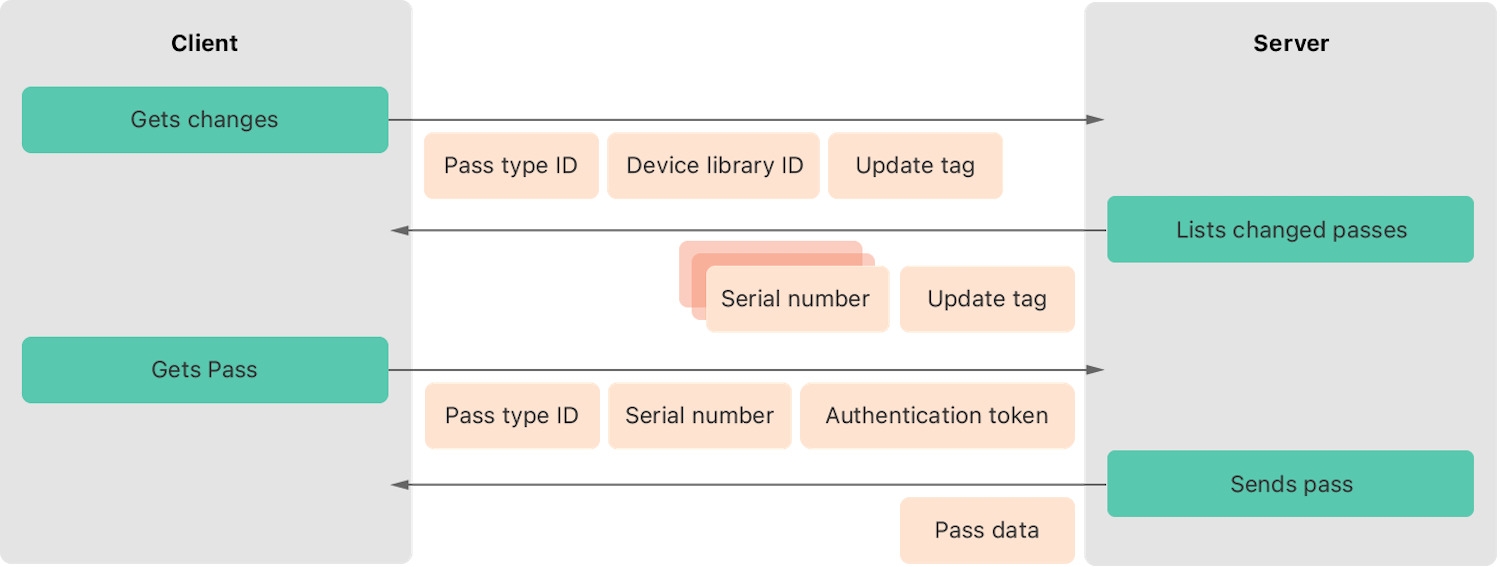
Diagram of how the updated passes are obtained and updated.
For sending the invisible notification, openssl and the certificates used for signing the pass can be used.
curl -v –header “apns-topic: <passTypeId>” –header “apns-push-type: alert” –cert <certificate> –cert-type PEM –key <PK of the certificate> –key-type PEM –data ‘{“aps”:{“alert”: “test”}}}’ –http2 https://api.push.apple.com/3/device/<idDevice> –pass <certificate password>
The phone will receive the notification and request the serialNumbers of the passes to be updated. Apple recommends creating a database to store the pass information and their last update date, but alternative ways can be used. Once the list of serialNumbers is returned, the device will ask for the update of the passes whose numbers match any of the list. If the endpoints are correctly programmed, this process will be done automatically (except for sending the “invisible” update notification).
Update passes in Google
In the case of Google, a pass can be updated using the API endpoints. It will automatically show the pass with the new information to the end user, no further action is required. In addition, Google allows you to update the class, making it automatically update certain information for all cards belonging to the class.
Send notifications on Apple passes
Automatically updating the pass is important to improve the user experience, but also to be able to add sending notifications to Apple passes. When a pass is automatically updated, it can be added to show one or more notifications. This can be done by adding the changeMessage field in the passFields attributes of pass.json, here you can see what these fields are. If we include a changeMessage, when we send the new pass to the device, it will show a notification whose text will be the value of this field.
Send notifications on Google passes
With respect to notifications, Google works in a similar way to Apple. Notifications are an attribute (Message) within the card and can be added more or less as appropriate. There are two ways to add these messages:
- Update the pass by adding the messages manually to the object or class.
- Use the addMessage endpoint.
It is also allowed to add messages to a class, so that all passes belonging to that class will receive the same message. Google limits the number of messages that can be sent per card per day. In this case, each card can only receive three messages in a single day.